
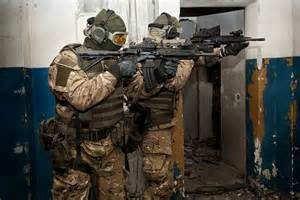
The goal is to understand what a shooter does when taking a shot, understand what is right when the shot is taken, and what can be improved. So that a machine can learn, taking a shot must be broken down into a set of sub-tasks. These sub-tasks are defined by a goal and the steps taken to reach the goal are broken down into a small set of discrete steps. These steps are captured and then presented to a machine to learn what works and what needs improvement.
The capture device for physiological data is a suit.
![]()
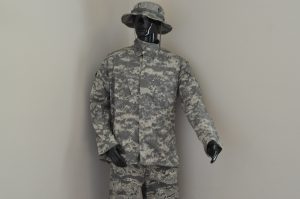
The suit is made to be worn as an under garment, in no way hinder the shooter’s ability to take a shot, and to capture multiple streams of real time physiological data. http://biosension.com/2016/10/29/spuma-suite/
The captured data is used to teach a number of systems that are learning by applying deep learning algorithms.

The data captured from each shooter helps following students learn.
And the captured data from current shooter is compared against the data captured from previous shooter so that real time advice can be provided to the current shooter.
Sub tasks were captured from two shooting guides.
a. Navy Seal Shooting https://www.amazon.com/Navy-SEAL-Shooting-Chris-Sajnog/dp/194378700X
b. 30-10 Pistol Training https://www.amazon.com/30-10-Pistol-Training-Chris-Graham/dp/1503016463/ref=sr_1_1?s=books&ie=UTF8&qid=1478294260&sr=1-1&keywords=30+10+shooting+chris
Sub Task Training Scenarios
Each task is 15 to 20 seconds
Monitor physiology and video in 3D
Various levels of anxiety – lights – audio sensory over load – low light
Handgun
1. Natural Point of Aim
a. Aim
b. Close eyes
c. Relax
d. Open eyes
2. Adjust with lower body
3. Look at target – bring sights to eye
4. Wiggle toes – demonstrate relaxation
5. Toes/ second knuckle point to target
6. Weaver
a. Shooting from side window
b. Through wind shield
c. While moving
7. Isosceles
8. Bone support – not muscle
9. Work area is in front of face
10. Eyes on target
11. On ground
a. Urban
b. Urban prone
c. Fetal prone – feet against cover
d. Sitting split leg
e. Sitting single leg
f. Squat – lower surface area
g. Supine
12. One handed unsupported
a. Shoulder packed and relaxed
b. Clinched fist
c. Possible thumb up
13. Grip
a. Contact with grip 99%
b. Trigger pull 1%
c. Aligned behind gun
d. Skin tented up
e. Fill natural space
f. Reaction hand
g. Thumbs straight forward
14. Cognitive Dissonance – Anxiety because of conflicting choices
15. Trigger finger
a. Tip of finger
b. Tip – but 99% grip
c. Second knuckle straight toward target
d. Middle of trigger – not too high or two low
e. Not dragging along weapon
16. Follow through
a. Prepped
b. Relaxed
c. No movement
d. Reset trigger
e. Prepare for next shot
f. Call shot
17. Drop holster
a. High but still clear kit – minimize time
b. One leg strap
18. Draw – holster
a. Natural position
b. Natural reach to holster – not too far in front or in back
c. Minimum elbow exposure
19. 4 Step Draw Relative Slow
a. Grip
b. Draw rotate
c. Center of chest
d. Press out
20. Rubber band
a. Flinch to draw
b. Drive down front sight
c. Drive gun to where you clap – slight forward and eyes
d. Drive forward
21. Stances
a. High ready
b. Inside carry
c. SUL
d. High port
e. Retention
22. Reaction hand draw
a. Twist body – holster – closer to reaction hand
b. Squat – pinch gun between legs
c. Muzzle forward past knees
d. Press gun out
23. Workspace always in front of face – can scan – understand situation
24. Release slide
a. Strong hand
b. Reaction hand
c. Sling shot
d. Power stroke
25. Press check
a. Regular/low light
b. Visual/physical
c. Push back serrations
26. Unload
27. Reloads
a. Magazine pouches – natural position
b. When to?
c. Stay in workspace
d. Index rounds
e. Eyes on target
28. Speed reload – skip save of magazine
29. Tactical
a. Use reserve
b. More controlled
c. Save magazine
30. Lights – low level
a. Gun mounted
b. Harries
c. FBI
d. Ayoob
31. Malfunction
a. Feed – tap, rack, bang
b. Failure to go into battery – heel strike – hammer fist
c. Stove pipe – power stroke – no hand in front of muzzle
3 2. Illustrate interview
33. Illustrate pull back clothing
34. Illustrate scan
35. Illustrate cover/concealment
36. Illustrate dynamic targets – draw on event
37. Illustrate close armed attack weaver
Carbine
1. Consistency
2. Solid Platform
a. Easier to hold gun
b. Maintain site picture
c. Upper body drives
d. Lower body maneuvers terrain
3. Bone / relaxed muscle / Natural Point of Aim
4. Standing
a. Toes toward target / feet shoulder width/knees bent
b. Strong side leg back
c. Buttstock more in chest under strong eye
d. Reaction hand guard far forward
e. Some part of hand above barrel
f. No hinge in arm
g. Drive carbine with reaction hand
5. Squatting
a. Feet as wide as shoulders or greater
b. Feet toward target
c. Knees bent to get barrel at desired level
d. Back straight – lifting weights
e. Buttstock center
f. Nose over toes
g. Sights to eye
h. Elbow close
i. Reaction Hand above barrel — far forward as possible
j. No hinge
k. Drive gun with reaction hand
6. SBU – Special Boat Teams – low profile
a. Rotate sights 90 degrees – sights and head lower
b. Buttstock slides out and up
c. Use contact point to strengthen platform
d. Keep elbow down
7. Kneeling – lower profile – still mobile
a. Unsupported
b. Supported
8. Cross Ankle
a. 45 degrees off to strong side
b. Upper body remains same as other shooting positions
c. Bone support – relaxed muscle
d. Find Natural Point of Aim
9. Split Leg
a. Knees bent 90 degrees
b. Maintain upper body position – exception flared arm
c. Hook arms – knees for support
d. Relaxed muscles
10. One Leg
a. Hook hand under receiver and magazine
b. Arch your back – support
c. Minimal leg muscles
11. Prone – most stable – least profile
a. Heels down
b. Both elbows for support
c. Body in straight line with gun
d. Should be able to release strong hand – no weapon movement
e. Use magazine as support
12. Urban Prone – shoot under cars
a. Make sure ejection port not too close to ground
b. Minimal body exposure
c. Use ground for support
13. Fetal Prone – Getting Small
a. Tuck – feet against solid object
b. Maintain upper body position
c. Shoot around object
14. Supine
a. On back – toes out
b. Core contracted – arms in contact with abs
c. Keep muzzle past knees
Carbine Mounts
1. Prevent Lazy support hand – move forward
2. Low Ready – 45 degrees down
3. High Ready – lower just enough to see over sights
4. High Port – straight up – threat from above
5. Inside Carry
a. Head eyes up
b. Muzzle pointed between feet
6. Retention – Need a free hand
7. Reaction Side
a. Only if necessary
b. Close Dominant eye if using sights
c. Place gun close to eye
Carbine Manipulations
1. Loading
a. Load carbine last after all tasks complete
b. Magazine pouches in natural position
c. Load secondary weapon first – first line gear
d. Back to work space
e. Buttstock between forearm and stomach
f. Eyes on target
g. Index
h. Pull down to ensure in place
i. Bolt release
j. Drive
k. Scan
2. Press Check
a. Even number rounds first is on right
b. Checking ejection port – issue with low light
3. Unloading
a. Back to workspace
b. Buttstock between forearm and side of stomach
c. Magazine release
d. In pouch
e. Check to make sure clear
f. Check for no magazine
4. Selector switch
a. Strong grip
b. Use opposing forces – thumb and weapon movement
5. Reloads Speed
a. Eyes Muzzle Threat EMT
b. Release old grab new
c. Gravity to help release
d. Eyes on target
e. Insert new magazine
f. Release bolt
g. Drive gun out
6. Tactical Reload – More Time
a. Pull magazine from reserve – not sweet spot
b. Gun back to workspace
c. Form L with new magazine and magazine in gun
d. Release old magazine with trigger finger
e. Insert new magazine
f. Save old magazine furthest away