![]()
SUPMA Suit stands for:
Shooter Undergarment Physiological Measurement & Analysis
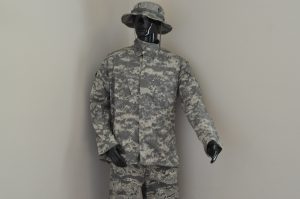
The first picture is that of a military shooter.
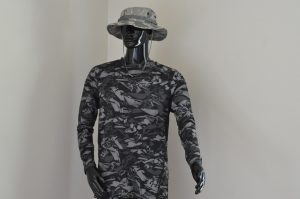
The next picture is that of a shooter wearing the SUPMA Suit.
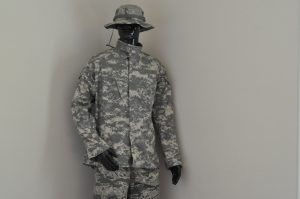
And the next picture is a shooter wearing a SUPMA Suit underneath a working uniform.
The suit is invisible to the outside world. The suit pretty much does not care about type of activity.
The suit is light weight and designed to wear as an under garment. The thing that makes the suit unique is two embedded — very small computers — designed to collect and transmit up to twelve physiological measurements. These are:
- Muscle movement as compared to bone support in both calves.
- Muscle movement as compared to bone support in both thighs.
- Muscle movement as compared to bone support in both fore arms.
- Muscle movement as compared to bone support in both upper arms.
- Trigger pull.
- Breathing.
- Heart activity.
- Anxiety level
- Brain activity
The suit is used as a collection device. Data is transmitted to a bank of computers that are involved in two separate activities.
- Real time data is collected and added to data from previous shooters. The collected data is used to train a deep learning system. Each time data is collected from a shooter in a different context, the system learns more about what makes an outcome a success or failure.
- As real time data is collected, it is compared to data from previous shooter sessions and advice is offered to the shooter to increase the probability of success — surviving the fight.
Data is collected at our facility where we control context and anxiety levels. The smallest shooter movement is mapped to physiological responses for analysis.
We needed to bound the number of contexts. We used two training scenarios. One is from a retired MARSOC Marine and the second training scenario is from a retired Navy Seal. If you are interested in either book, please contact me at troy@biosension.com and I will provide a reference on Amazon and their associated web sites.
Each task is a self contained unit.
Training Scenarios
Each task is 15 to 20 seconds
Monitor physiology and video in 3D
Various levels of anxiety – lights – audio sensory over load – low light
Pistol
1. Natural Point of Aim
a. Aim
b. Close eyes
c. Relax
d. Open eyes
2. Adjust with lower body
3. Look at target – bring sights to eye
4. Wiggle toes – demonstrate relaxation
5. Toes/ second knuckle point to target
6. Weaver
a. Shooting from side window
b. Through wind shield
c. While moving
7. Isosceles
8. Bone support – not muscle
9. Work area is in front of face
10. Eyes on target
11. On ground
a. Urban
b. Urban prone
c. Fetal prone – feet against cover
d. Sitting split leg
e. Sitting single leg
f. Squat – lower surface area
g. Supine
12. One handed unsupported
a. Shoulder packed and relaxed
b. Clinched fist
c. Possible thumb up
13. Grip
a. Contact with grip 99%
b. Trigger pull 1%
c. Aligned behind gun
d. Skin tented up
e. Fill natural space
f. Reaction hand
g. Thumbs straight forward
14. Cognitive Dissonance – Anxiety because of conflicting choices
15. Trigger finger
a. Tip of finger
b. Tip – but 99% grip
c. Second knuckle straight toward target
d. Middle of trigger – not too high or two low
e. Not dragging along weapon
16. Follow through
a. Prepped
b. Relaxed
c. No movement
d. Reset trigger
e. Prepare for next shot
f. Call shot
17. Drop holster
a. High but still clear kit – minimize time
b. One leg strap
18. Draw – holster
a. Natural position
b. Natural reach to holster – not too far in front or in back
c. Minimum elbow exposure
19. 4 Step Draw Relative Slow
a. Grip
b. Draw rotate
c. Center of chest
d. Press out
20. Rubber band
a. Flinch to draw
b. Drive down front sight
c. Drive gun to where you clap – slight forward and eyes
d. Drive forward
21. Stances
a. High ready
b. Inside carry
c. SUL
d. High port
e. Retention
22. Reaction hand draw
a. Twist body – holster – closer to reaction hand
b. Squat – pinch gun between legs
c. Muzzle forward past knees
d. Press gun out
23. Workspace always in front of face – can scan – understand situation
24. Release slide
a. Strong hand
b. Reaction hand
c. Sling shot
d. Power stroke
25. Press check
a. Regular/low light
b. Visual/physical
c. Push back serrations
26. Unload
27. Reloads
a. Magazine pouches – natural position
b. When to?
c. Stay in workspace
d. Index rounds
e. Eyes on target
28. Speed reload – skip save of magazine
29. Tactical
a. Use reserve
b. More controlled
c. Save magazine
30. Lights – low level
a. Gun mounted
b. Harries
c. FBI
d. Ayoob
31. Malfunction
a. Feed – tap, rack, bang
b. Failure to go into battery – heel strike – hammer fist
c. Stove pipe – power stroke – no hand in front of muzzle
32. Illustrate interview
33. Illustrate pull back clothing
34. Illustrate scan
35. Illustrate cover/concealment
36. Illustrate dynamic targets – draw on event
37. Illustrate close armed attack weaver
Each task is designed to be a small and compact number of operations that our system can learn to identify — both executed well and executed with errors.
The goals are to:
- Provide immediate feedback to the shooter
- Help both shooter and instructor share thoughts based upon the latest captured data and the execution of successes and failures of previous shooters.
Need to know more — troy@biosension.com